
 1 month ago
53
1 month ago
53
Maybe it’s because editing means that I’m through the difficult process of coming up with a new idea, writing the lyrics, composing the music with just the right hook, and because I finally know it’s all going to work. I don’t worry about the piece anymore, so I think the editing process helps me relax a bit and really enjoy the work that’s been created.
I’m also a little obsessive about details, so weird or not, I’m excited to tell you about the editing process and how a piece can morph even after it’s written!
What Does Editing Look Like?
I have two stages of editing:
- The rough stage – This is the stage where I add all the necessary things to the score that haven’t been added yet like lyrics, fingering, articulations, etc.
- The polishing phase. This is the stage where I pour over it at least 9 times (see why it’s that number below) and fix issues based on what I see.
The First Stage of the Editing Process
1. Adding Lyrics
After the lyrics are written in a separate program (see my other post about how I lost it all the other day) and the music is notated, it’s time to actually type the lyrics into the score. Most notation programs do a decent job of this, but sometimes, a piece with multiple verses becomes quite a challenge. In the case of the Easter Egg Hunt, I had to decide what to do about the fact that the piece repeated and that there was a word on first beat of the repeat for verses 2-4 but not for verse one. Ugh.
I won’t bore you with all the ways I could have written it, let’s just suffice it to say that I think it was solved the best way possible. You can see in the music what a challenge this might have been!
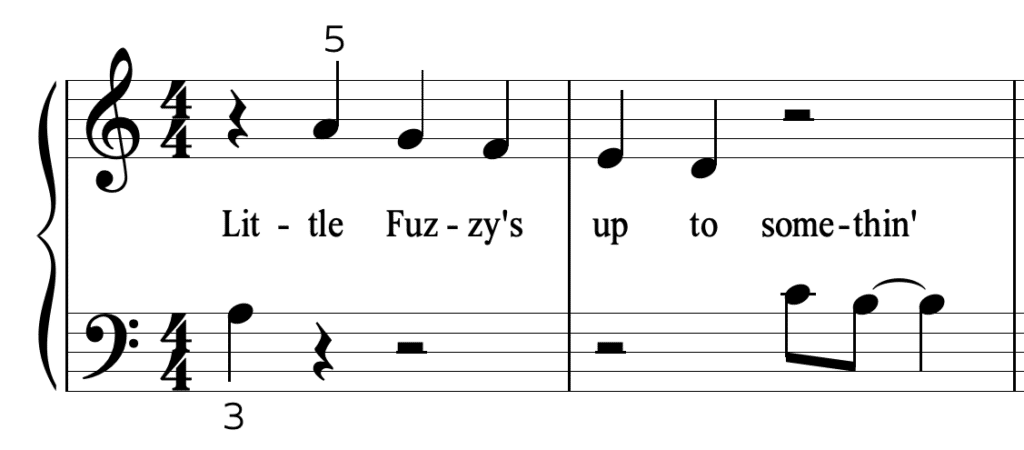
But one detail I will tell you: At the end of April Fools’ Mischief, the students get to bounce up on the piano bench every time they play an A! (That’s the April Fools’ joke the Little Fuzzies rigged with their power tools at the piano.) I noticed that the original way I composed it was a little difficult because it required the student to bounce on beats 1 and 2 of that measure:
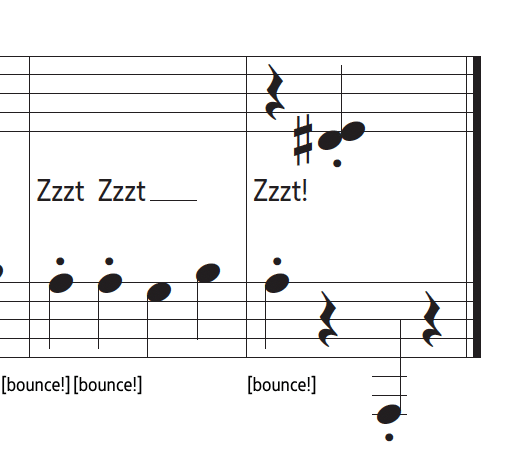
Now, I could do it of course and I’m sure every teacher could, but I always try to imagine myself in a 6 year old’s body, a body that might not be great at rhythm yet, and see how it feels for them. When I did this, I realized that it was going to be okay for some and challenging for others.
So I brainstormed a bit and came up with just bouncing on beat 1 of both measures because that’s the beat that they are used to bouncing on for the previous measures:

Much better, and much easier!
2. Adding Fingering
The second part of the rough editing process for me is to add fingering. That normally would be an easy process for elementary level music, but since ComposeCreate music tries to push students into new positions, I have to give a lot of thought to what hand positions students are used to so that everything feels somewhat familiar, that I push them a little, but don’t push them too far.
Here’s one of the decisions I had to make. Should I have the student play the entire descending motive like a scale where they cross their 3rd finger over? Or should I have the motive divided between the hands? Here were the pros and cons of each:

PROS:
- The student gets to practice scale fingering.
- They get to use strong fingers that are close in length to each other, so playing a 3-2 would seem natural.
CONS:
- The student may never have crossed over before.
- The student would have to re-find their hand position (pinky on A) every two measures after they’ve crossed over.
- The left hand has less to do.
- The student would have to move their 3rd finger to A instead of the 2nd finger for the B motive.
PROS:
- The left hand can be more involved.
- The hands can stay in a comfortable position and don’t have to move
- There’s no concern that crossing over is a new concept. When a new concept has to be mastered before a piece is played, the chances of the piece being practiced and loved go down.
- The hand position for the A section matches the hand position for the B section
CONS:
- Playing 1-2 fast can be tricky.
In the end, I chose the 2nd example. But as you know, I am highly in favor of any teacher making their own decision about this based on what’s best for the student!
3. Adding dynamics and articulations
Adding dynamics is usually a pretty easy part of the editing process. But sometimes the decisions that go into adding articulations are not. Sometimes we leave off articulations if it crowds the music and there’s no other way to really play the piece.
There’s a great example in Easter Egg Hunt! I started out by adding both staccatos and slurs. This would obviously be the most confident insurance that students would play the notes the way I intended.
However, once I got the slurs in, it looked crowded. So the next question I always ask myself when it looks crowded is, “Is this absolutely necessary? If I left off the slurs, would the student NOT play it legato? What’s the likelihood of students playing this staccato if I leave off the slur?”

CONS:
- This looks crowded. There are a lot of things for the student to look at including notes, lyrics, ties, fingering, first and second endings, etc.
PROS:
- There’s no question that the student should play the steps legato

CONS:
- There might be a question as to whether they should play the non-staccato notes legato. But is there really any other way to play it?
PROS:
- It’s much cleaner and less confusing for the student.
In the end, I opted for leaving off the slurs. The truth is that since I’ve already denoted that certain notes should be staccato, the chances of them playing the other notes staccato is slim. Then, the fact that it’s all steps means that there is little likelihood that they’ll leave a space between each of the notes. Plus, if a student did play it incorrectly, I decided it wouldn’t upset me. So I opted for the cleaner look in the score.
Once I get to adding the dynamics and articulations, I know that I’ve got pretty much all the essential elements notated in the piece and I’m ready to begin the second phase of editing: the polishing phase.
The 2nd Stage of the Editing Process: Polishing
Years ago, I figured out the best way to make sure that I don’t miss any mistakes or details is to:
Only look for one thing with each playing of the piece.
What this means is:
- I go through the piece one time looking for notes and rests that are wrong.
- Then, I go through the piece one time all the way through looking for fingering mistakes.
- Then, I go through the piece one time all the way looking for dynamics mistakes.
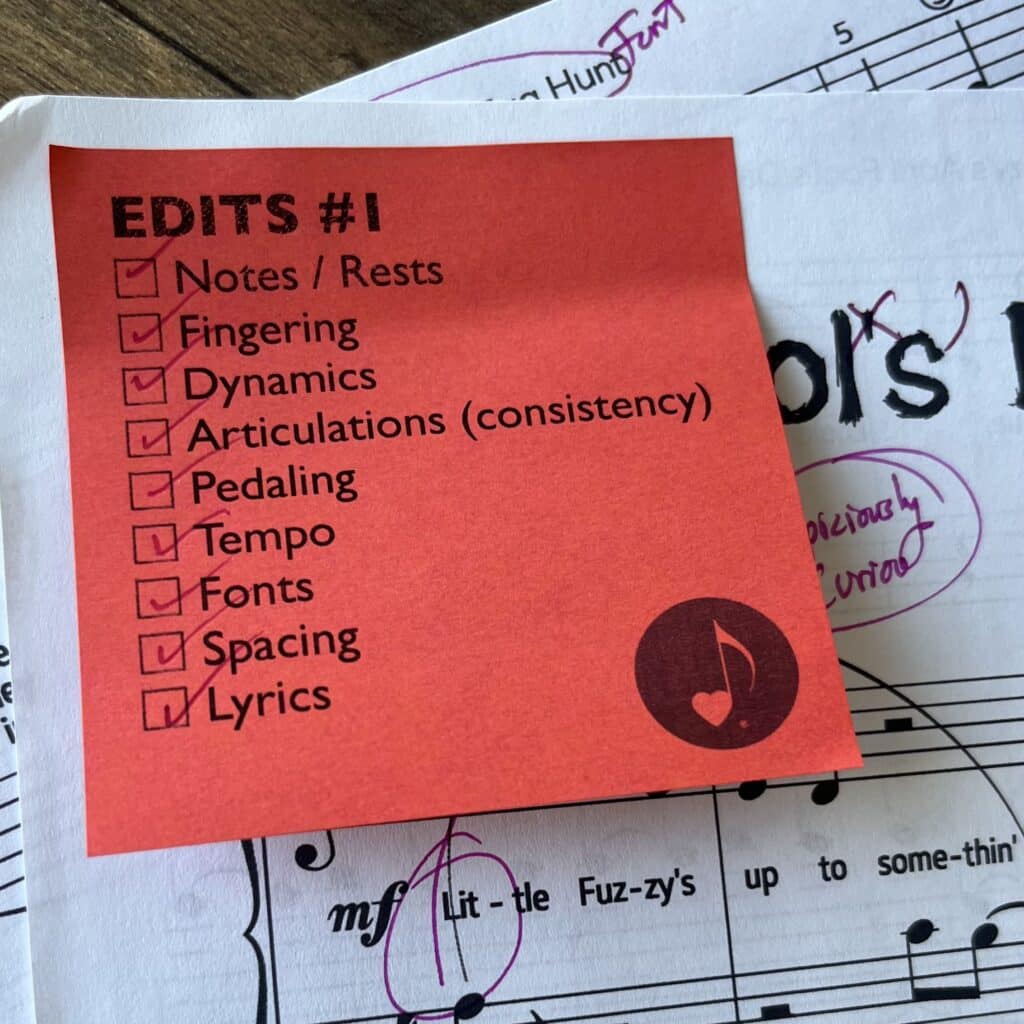
You get the idea! I do this 9 times and here’s my list of things that I go through. You can see on the left that I have printed out post it notes (thanks to Joy Morin from Color in My Piano blog) that I use to help make sure that I account for each of these 9 things:
- Notes and rests
- Fingering
- Dynamics
- Articulations (are they present, are they consistent?)
- Pedaling
- Tempo
- Fonts (are they consistent?)
- Spacing of the music, staves, etc.
- Lyrics
So when it’s all said and done, I will have gone through the piece with a fine-toothed comb 9 times.
Many of the mistakes that I check for would seem obvious to you, but here are just a less obvious details and errors that often occur, but which we don’t often think about:
- Lyrics and syllables – When we sing, we divide the syllable according to where the vowel is, right? So since you can never “sing” a note on a consonant, it’s always the vowel that we are holding when we hold a long note. However, lyrics are not written in music in this way. They have to be subdivided according to the traditional way of dividing a word into syllables. And even though I’ve been quite a grammar and spelling policeman all my life, I still find myself making all kinds of mistakes about how to divide words into syllables. So there’s always edits when I have lyrics and I check every single multi-syllable word in an online dictionary to make sure it’s divided properly.
- Crashes – Lyrics, dynamics, and articulations frequently crash on a piece of music. You can see in the picture above that my slur crashes with the word “little.”
- Fonts – My old music publisher, Hal Leonard, solves the issue of fonts by always using the same font in almost every book or piece. Perhaps this is what I should do, but I find myself much more interested in music that has a font that looks interesting. And I’m pretty tired of Times New Roman. So we go the extra mile to make sure that all the fonts are all the same when we are using a unique one. That includes lyrics, copyright, measure numbers, expressions, first and second ending fonts, and more. But it’s worth it to me because I think the variation makes the music and the special series of music that we have more interesting.

After all that editing is done, I usually send it to my assistant and they check for similar things, but with a fresh set of eyes.
When I’m sure it’s as clean as possible, we are ready to assemble the PDF.
But before I do that, the cover must be ready! And that’s one of my favorite parts. I’ll tell you about that in the next installment of this Process of Composing an Elementary Piano Solo series.
Let me know if you have questions below or if you want me to expand on anything in particular!


 English (US)